

How to start a workspace
This page is the practical checklist for creating a new workspace. For background concepts, see Workspaces & workspace templates.
Create a workspace
Section titled “Create a workspace”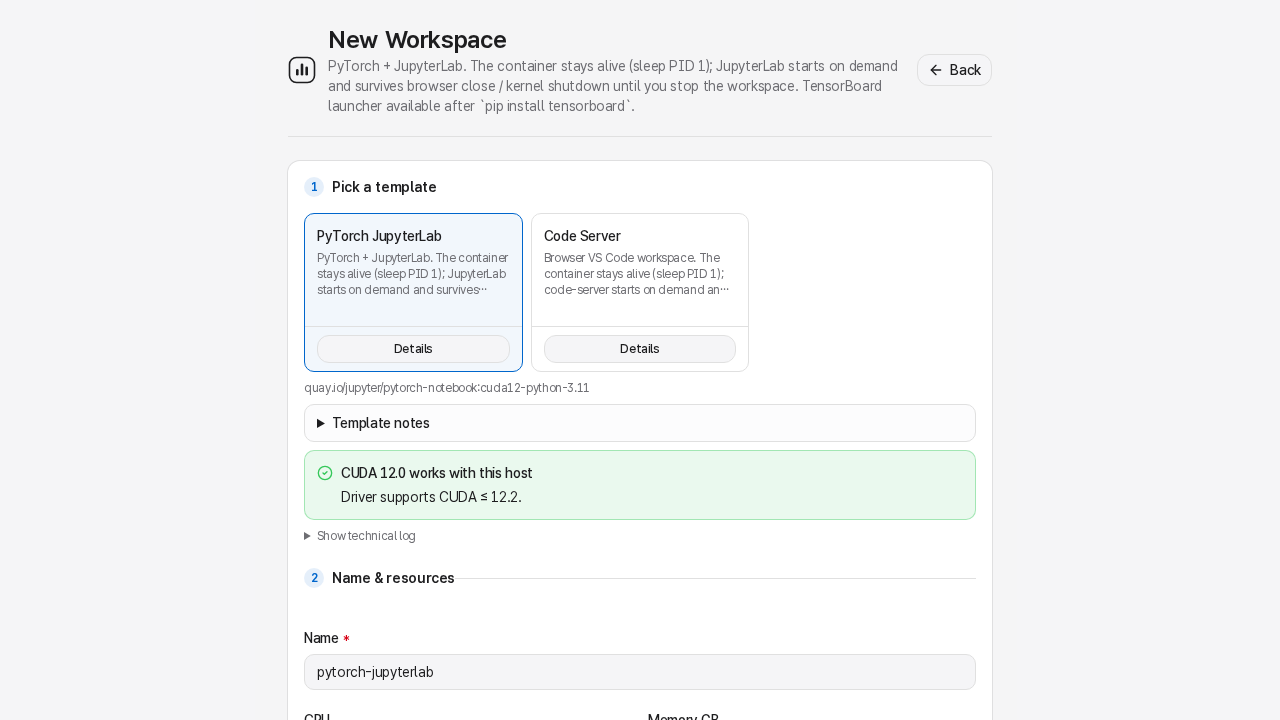
- From the workspace list, press Set up workspace.
- Pick a workspace template.
- Global workspace templates are maintained by your admin.
- My workspace templates (under Advanced tools → Workspace templates) are private ones you created or imported.
- Enter a workspace name, or keep the suggested name.
- Review the recommended resources (processors, memory, accelerator).
- Open Customize if you need to change exact CPU, memory, GPU mode, folders, environment variables, declared ports (Apps & network), or check image/build details (Diagnostics).
- Press Create workspace.
This step only registers the workspace - it does not start the container, download or build any image, or claim any GPU/CPU/memory. Selecting a workspace template does not begin a download either. If the workspace template’s image still needs preparing, open the new workspace’s own page and use Download image or Build image. For most global workspace templates, Download image pulls a tested published image directly - no administrator needed. Workspace templates that ship a Dockerfile instead, including MATLAB and MS Code Serve-Web, use Build image, which builds in your own account. Personal workspace templates build the same way, from Advanced tools → Workspace templates → My workspace templates. Once an image exists, Rebuild image is available if you need to rebuild it later.
Choose CPU and memory
Section titled “Choose CPU and memory”Open Customize → Compute and set:
- CPU - the number of CPU cores the workspace can use.
- Memory - the RAM limit in GB.
Raise CPU for preprocessing or dataloaders. Raise memory for large in-memory datasets, notebooks, or model loading. If the server runs cgroup v1, the UI warns that CPU and memory limits are not enforced on that host.
Choose GPU
Section titled “Choose GPU”Still in Customize → Compute, the GPU controls depend on what your admin enabled and what your quota allows. A Light / Medium / Heavy use-case picker sets a sensible mode automatically; open its nested Advanced: pick exact GPU mode for direct control.
| Mode | Use when |
|---|---|
| No GPU | You are editing code, preprocessing data, or running CPU-only work. |
| Whole GPU | You need full device performance or compatibility. |
| Shared | You need part of a GPU with a memory and compute cap. |
| GPU slice (MIG) | Your server has MIG-capable GPUs and you need an isolated slice size. |
If whole GPU capacity is busy, you can still create the workspace and start it later when a GPU is free. If the workspace template requires a GPU and your quota is exhausted, the primary button remains blocked.
Add folders
Section titled “Add folders”Every workspace automatically mounts your host ~/work directory as /work. To add more folders:
- Open Customize → Folders.
- Keep or uncheck admin-provided shared mount presets.
- To add your own folder, click Add folder.
- Pick a host folder from the file picker.
- Set Path inside workspace, for example
/mnt/<your-username>/my-project. LabPod suggests this editable target for personal folders;/workand/home/<you>are reserved. - Leave Read-only enabled unless the workspace must write to that folder.
- Click Done.
Folder changes apply when the workspace starts. If the workspace is already running, stop and start it after changing folders from Manage workspace → Settings.
Add environment variables
Section titled “Add environment variables”Use environment variables for values the container should receive at start time.
- Open Customize → Environment.
- Enter a name and value, then Add.
- Create the workspace.
Examples:
HF_HOME=/work/.hf-cacheWANDB_MODE=offlineCUDA_VISIBLE_DEVICES=0Avoid putting long-lived secrets in workspace templates, because workspace-template environment variables are reused by every workspace created from that workspace template. For per-workspace tokens, add them on the workspace itself and rotate them when they are no longer needed.
Start and open it
Section titled “Start and open it”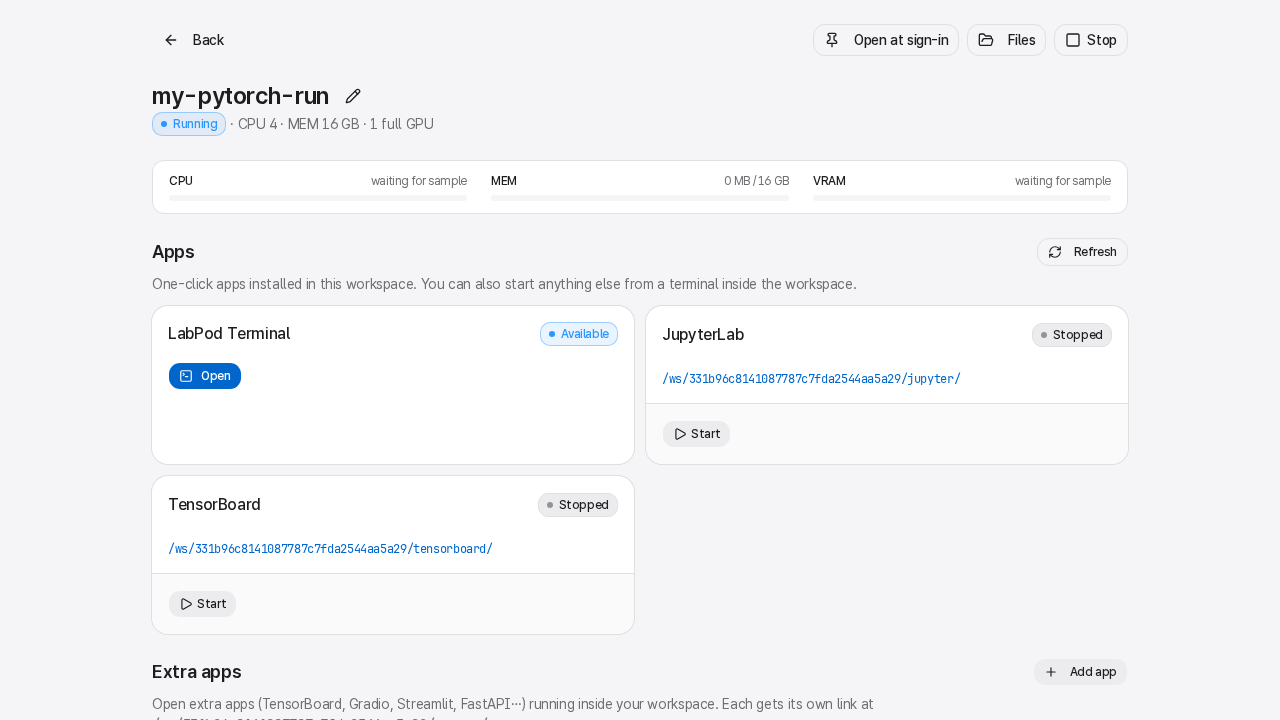
After creation, open the workspace detail page. Its main-app card leads with one state-correct button:
- Start workspace (or Resume workspace) - brings the container up, applies your resources, mounts folders, injects environment variables, and attaches any selected GPU. This is the only step that claims your quota.
- Once running, Launch
<app>starts the main app and opens it in a new tab automatically once it’s ready - no separate Open click. - Terminal and Files sit next to the main app as one-click shortcuts.
Additional launchers (JupyterLab, code-server, TensorBoard, MLflow, …) live under Manage workspace → App controls: press Launch on a card, then Open once it’s running.
Change settings later
Section titled “Change settings later”Open the workspace detail page, expand Manage workspace, and press Settings. You can change resources, folders, and environment variables while the workspace is stopped. The workspace template itself is fixed; create a new workspace if you need a different one.
Stop or delete
Section titled “Stop or delete”Under Manage workspace, press Stop when you are done using compute. Your /work files
and the workspace home survive stop/start.
Under Manage workspace → Settings → Danger, use Delete only when you are finished with
that workspace. Delete removes the workspace configuration. Its per-workspace home directory is
archived (not deleted) into a recoverable location under your account. It does not remove your
/work directory.